The ‘art’ of retouching a picture whether it be for commercial work or personal images is the essence of todays digital photography.
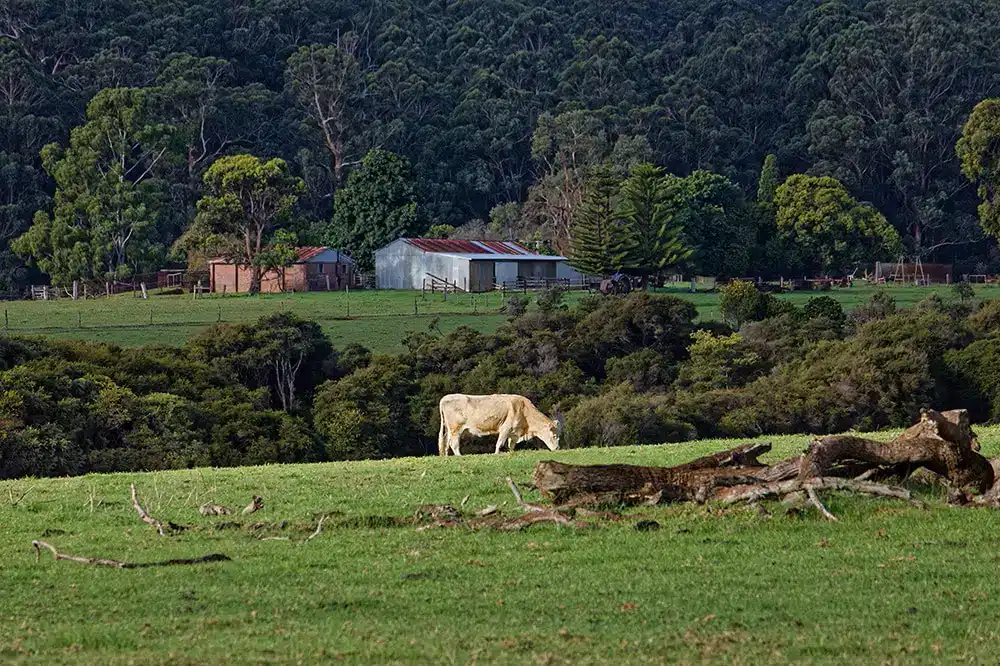
I was fortunate that on a rainy winter afternoon just outside the South West town of Pemberton there were little glimpses of sunshine popping through the gloomy sky lighting up patches of this fertile farmland from time to time. Standing getting rained upon I could see the potential of this picture. I was looking for that classic Aussie corrugated iron farming shed and this is the best I’ve seen so far in my limited search.
With the pictures I shoot for myself while I’m photographing them I start to visualise what retouching I’ll do in photoshop to create the end result. I like to rid the picture of what I call ‘Visual Clutter’ and clean them up so that when somebody looks at the end result they see the image I’d visualised when shooting it. I don’t change anything radically, I just take what’s presented to me and would like to think I enhance it.
Some people say this isn’t photography, they’re entitled to their opinion. Maybe they don’t have the ability to visualise my version of the original picture? Isn’t this the same as an artist’s interpretation of what they’re seeing? I’m doing exactly the same but I’m using the medium of photography rather than a canvas and brush. I haven’t studied art, this visualisation has evolved over many years of experience. Having shot well over a million picture frames professionally and personally plus winning many major photographic awards I know it works.
When I look at the original image on my large monitor before I start the retouching I scrutinise it and begin to visualise how I want the final picture to look. Below is a list of the alterations I completed to the original picture shot. I’ve completed each of these alterations for a specific reason and the way the viewer will see the final picture.
The two blog pictures that are posted, one is the original image and the other is the final retouched picture.


Retouching Pembo Moo and creating my classic Aussie farm buildings scene
01. Remove the extra cows so the viewer is drawn to one central cow
02. Remove and shorten the sticks on the foreground grass that extended into the thicket
03. Clean up the grass
04. Lessen the tree trunk and move it away from the cow’s face grazing
05. Add more detail and slightly darken the main cow to replicate what you see in real life rather than the over exposed sunlight cow
06. Lighten and pull out the thicket to give more detail on the left hand side edge of the image
07. Remove the car and lessen the shed
08. Remove the large white power pole
09. Remove the the small white fence poles
10. Remove the white structure on the brick milking shed
11. Remove the boat
12. Remove the red and blue livestock transporters
13. Take out any small white objects or soften them down
14. Clean up the tree branches next to the milking sheds
15. Lighten the reel and blue tractor
16. Lighten slightly the shadowed wall on the brick milking shed
17. Remove any bright patches on the background forest
18. Extend the background forest removing glimpses of the sky
19. Desaturate the red on the distant farm equipment
20. Slightly lightened and darken areas within the picture
21. Slightly enhance the colour tones
So this is the ‘art’ of retouching a picture. Twenty one alterations and that’s about it! There’s also a couple of other processes I go through but I’m not going to divulge all my secrets in creating that ‘classic’ picture by retouching it.
Since posting this article, Pembo Moo has won a Nominee Award in the prestigious 2024 International Color Awards.
